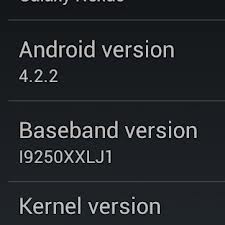
Do you know how to manually flash Android 4.2.2 for all GSM Galaxy Nexus owners waiting the OTA update?
You can use this guide only for Takju model from GSM Galaxy Nexus bought from Google’s Play Store in US.
The new Android updated version 4.2.2 comes with improved features:
In case you want to flash this new update,you firstly need to follow some pre-requisites:
- This guide is only for “takju” model of GSM Galaxy Nexus. You GSM Galaxy Nexus I9250 takju version should have Android 4.2.1 JOP40D factory firmware installed on it.
- The warranty will be restored with this ROM and the root access will be revoke for the rooted smartphones.
- Backup the important data, you can move this data on your smartphone’s internal SD card. you can save the data in the cloud.
- Enable the USB debugging option from your GSM Galaxy Nexus Developer Option. For your GSM Galaxy Nexus that doesn’t show in the Settings menu the Developer Options. Install the Android SDK software on your computer, and the USB drivers for your device in the PC.
- Deactivate and disable the security programs which can interfere with the flashing process programs like antivirus and firewall.
- Verify the level of the battery charge and it should be charged more than 65% level. Android Source team will not be held responsible for any damage caused to your phone.
How to manually install Android 4.2.2 JDQ39 OTA update for GSM Galaxy Nexus ‘takju’:
This guide works only if you have installed a STOCK recovery image , and if your device uses a custom recovery image like CWM or TWRP. First, download the ROM JB 4.2 JDQ39 OTA new update build from HERE orHERE, and save this file on your computer on your Desktop.
- Second, power off your android device.
- Now, boot your device into Fastboot mode. To do this press Volume Up, Volume Down and Power buttons together. From the Fastboot menu select ‘Recovery’ option, and when the device screen show a red exclamation point, you have to press Volume Up button and the Power button. A new menu appears.
- Chose the ‘Apply update from ADB’ option and select it to go the next step.
- Connect your device to your computer using the original USB cord. Your computer should have the Android SDK app installed. Now launch a CMD prompt (for Windows OS) in the same folder that created in the step one.
- Now enter the next command line for install the JB Android 4.2.2 JDQ39 new update on your Galaxy Nexus GSM taut version: dab side load 472aafeb9fe3.signed-takju-JDQ39-from-JOP40D.472aafeb.zip
- The flashing process will start, and the progress bar will notify you about the operation progress.
- When the installation is complete, you can restart your android device and then you need to wait to load the new Android version Operating System.
- When the boot animation logo is displayed you can disconnect the smartphone from the computer.
Congratulation,now you can test the new Android Jelly Bean 4.2.2 update installed on your ‘takju’ device.
The next procedure is for devices that running stock Android 4.2.1 JOP40D with a TWRP or CWM custom recovery image
- First, download the OTA Android 4.2.2 JDQ39 zip from the link in the guide above.
- Now connect the smartphone to the computer and copy the zip archive on its internal SD card.
- When the file is successfully copied disconnect the smartphone from the PC.
- Now, power of your device.
- Now boot the device into Custom Recovery Mode.
- In the custom Recovery Mode, select the ‘install’ option and then browse in your’s smartphone SD card for the JB Android 4.2.2 ROM zip archive.
- Confirm the installation of the update file.
- Reboot you Android device.
Congratulations, Now you can test your new Android 4.2.2 OTA update and give us the feedback in our comment section with the changes.


