Good news folks – the Galaxy S3 AT&T has been finally launched. You are only a tutorial away from finding out everything you need to know regarding the procedure that helps you to root it by using the CWM-based Recovery.
However, before you proceed with it – I must warn you that this guideline is generally addressed to all of you out there who are pretty familiar with all this procedure – so if you are an advanced Android user , this article is for you and for you only.
First of all make sure, you checked out all the instructions that you need to tick in order to proceed with the rooting process. There are different pre-requirements steps that you need to take and they are mandatory as they are key to a successful procedure.
If you are not comfortable with what you read and with all the steps involved here, it would be best to take your time and linger upon the decision of continuing with this. This is a very complex process that might even result in a failed attempt of your device, so this is something you want to avoid for sure.
You really need to follow all the steps presented exactly as it is – and be aware that even if you flash a single wrong file, you would end up with a broken device, and in that case, we don’t want to be held responsible for all this development.
This guide is only for the advanced Android users. This rooting process is developed by the guys at XDA forums.
Pre-requisites and Guidelines:
- First of all, only use the files in this post with the AT&T variant of Galaxy S3 – otherwise you implicitly risk breaking the device that is not exactly the same model.
- What will happen, if you try to apply the root files on other devices? This may dmage your phone.
- You have to make sure; you first install CWM Recovery files.
- Now this brings you a good layer of protection, because installing the CWM Recovery provides you a full back-up of the current system. In case something goes wrong you will be able to restore it.
- Now also please do enable USB Debugging mode on your smartphone.
- The battery level of your phone must be at least 70% charged.
- As mentioned above – all the steps are mandatory. It should be followed as it is presented to you. Don’t skip any instruction.
How to root AT&T Galaxy S3 using only CWM Recovery:
- The first step involved is the Downloading of the root CWM Super user .zip package from HERE. Once you download it, please save it on your computer.
- Then just go ahead and connect your phone to your computer and once you have done this, also move the ‘cwm superuser’ zip file on your SGS3 internal sdcard. Monitor, if the transfer is complete, and when it completes, do disconnect the device from your PC.
- Now you have to Power off the phone and then boot it into CWM Recovery. This can very easily be achieved by simply pressing and holding ‘volume up’ + ‘home’ + ‘power’ buttons. You will, afterwards, simply Wait until the CWM Recovery mode screen shows up.
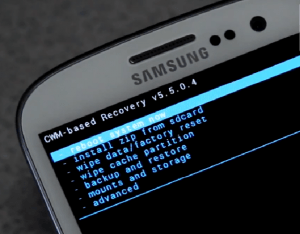
- Also -while in recovery mode, you have to select ‘install zip from sdcard’ and from the next menu select ‘choose zip from sdcard’ or ‘choose zip from internal sdcard’. Once you detect and get your eyes on the CWM SuperUser zip file, you shall have to select it.
- And now just confirm the installation (and then it is going to take a while – so you have to wait until the file is flashed).
- Now it gets a little bit easier – and when the installation of CWM SuperUser has been finished,you will have to immediately go back to the main recovery screen.
- Once you went back there, you also have to Select ‘reboot system now’ and then wait for your Galaxy S3 AT&T to load the home screen.
- Google Play Store, is what you have to focus on next – so just launch it on your device and search for the ‘BusyBox’ application or another option that you can try is to click this Play Store link on your PC (and of course then install the app from your Google account).
- Now that you have performed all these steps – you also have to Launch the BusyBox Free application.
- And after the app is launched – you need to make sure, you want to gain root access.
- Something you have to pay attention to – is to also Tap the X button.
- You will be asked to Confirm that you wish for the BusyBox app to scan your smartphone – so do confirm as requested.
- The last step for you to take is to Click Install for BusyBox Free app to install and apply all its files. Once you monitor the progress of the installation process and as soon as it ends, you will have to close the application and then simply enjoy all the perks you can benefit from this installation.
Congratulations! You have successfully rooted your device. You are now a few steps away from starting to search for all those new custom ROMs that you can now install on your device. And you can do it all by yourselves. Isn’t this a big accomplishment!
If you have enjoyed this tutorial and you have other devices you want to perform this on – then you can keep an eye on us as we are going to be working on some new guidelines on how to improve the overall performances of your other smartphones.
But if it happens that you didn’t manage to install the root files, we have another solution for you – you can try to repeat the steps again and if you need extra help, just leave us your feedback in the comment section below.
To double check whether your devices has been rooted or not, see if the BusyBox app is shown in the application drawer. If so – then the world is yours. This application will help you to install custom ROMs and gain access to all Android’s sub-system files which will assist you considerably to improve the overall performances of your phone.
You should consider yourselves lucky now that you can use your phones much better as you can make use of a lot of rooted applications for WiFi tethering, CWM Manager, ROM Manager, ROM Toolbox Lite, Titanium backup and multiple others. The list is so long that it will take you a while to explore all your options.
So, if you want to fully enjoy your Galaxy S3 experience, just go for this root and let us know how it went. We send our best wishes to you.